


NeoFinder Overview
When you launch NeoFinder for Mac, you will see the main NeoFinder window, similar to this one shown here.
![]()
The NeoFinder main window has six sections.
Let's look at all of them.
NeoFinder Toolbar
On the very top, you see the toolbar, with buttons for the most important commands, and the QuickFind field. You can navigate with the Back and Forward buttons, switch the content section to one of the five display modes, open the Find Editor, Light Table, and more.

Make sure to use the Help Tags provided when you hover over one of the button with the mouse, if you are not certain what that button does.
NeoFinder LIBRARY
The left side of the NeoFinder main window shows the NeoFinder LIBRARY. This contains all the Catalogs you have created, possibly grouped in Catalog Folders. Also, the Smart Folders and Albums are placed there, both also possibly grouped together, if you use a lot of them.
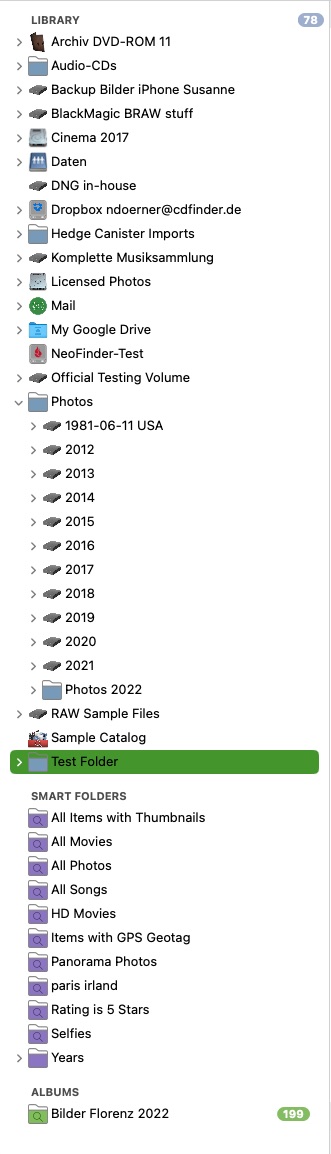
You can show and hide all three segments of the NeoFinder LIBRARY using the hidden triangles that only show up when you hover over them with our mouse.

The LIBRARY top section also shows you a grey bubble with the amount of catalogs that NeoFinder was able to find in your NeoFinder Database Folder.
You can hide and show the entire LIBRARY section of the NeoFinder main window by using the button directly underneath it.
NeoFinder Content View
Probably the part of NeoFinder you use most is the central Content View. Here, NeoFinder shows you the content of your Catalogs, or Albums, or the Found Items.
You can use five different view styles. There is the Icon View, the List View, the Column View, the Details View, and the Gallery View. Each have their own usages. Many use the Gallery View to show single items with large thumbnails, or the Column View to quickly navigate through complete folder structures of entire Catalogs.
![]()
The Content View also contains a header section at the top of the data, to show you what is actually currently being displayed.
At the bottom, you find the Display Filter and the Navigation Bar.
For all Views except the List View, there is also the Sort Menu, which allows you to specify how the content is sorted.
NeoFinder Inspector
Placed at the right part of the NeoFinder main window, the Inspector shows all known details about any item selected in either the NeoFinder LIBRARY of the NeoFinder Content View, depending what you have actively selected.
This is also the place of the powerful XMP Editor where you can change things like Ratings, Keywords, or other Metadata.
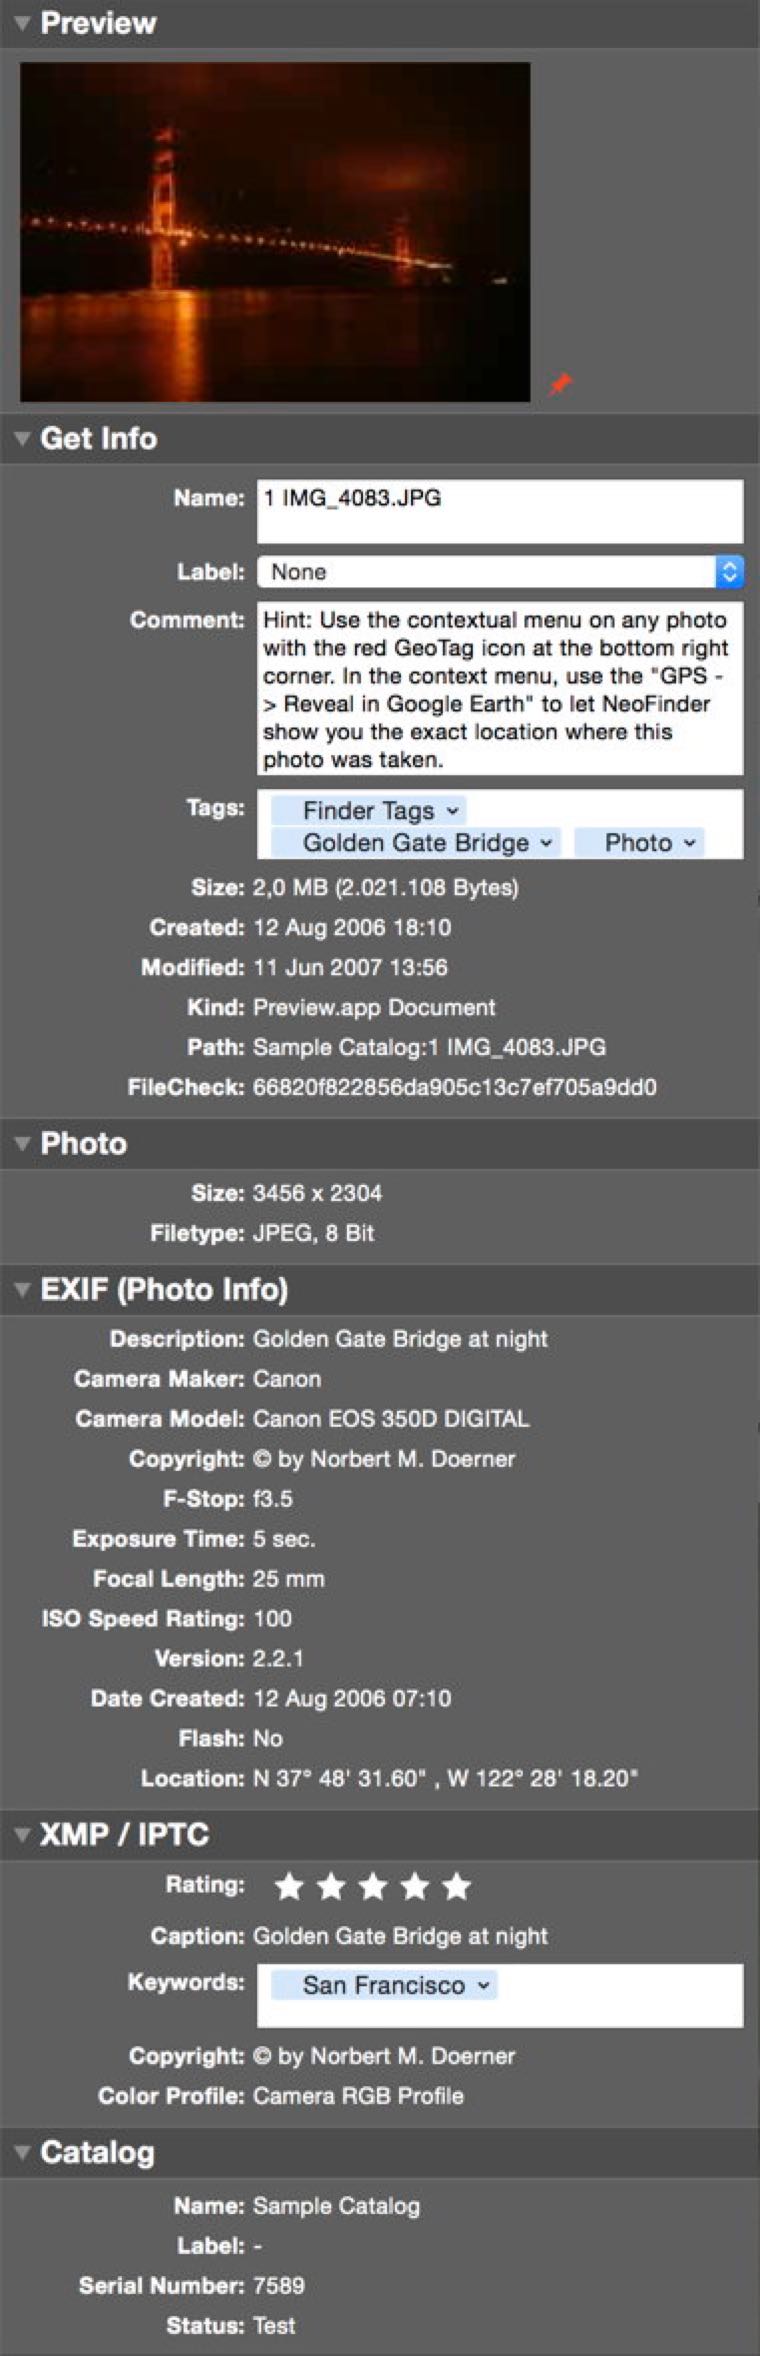
You can show and hide the entire right segment of the NeoFinder main window using the button directly underneath it.
NeoFinder Map
Embedded in the NeoFinder Inspector section, you can find the interactive NeoFinder Map. This allows you to look at the geographic location from which a photo or video was taken, and even offers you to edit or set such a GPS GeoTag.
This is also the home of the GeoFinder, where you can search for all photos or videos in any Catalog that were taken in the currently visible part of the Map.
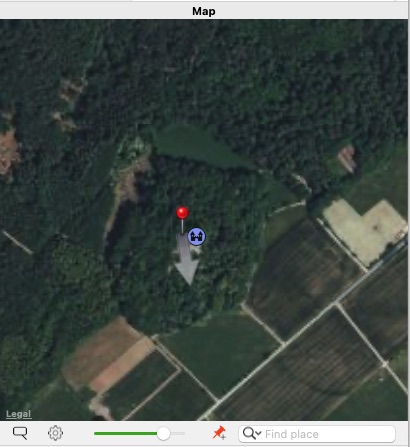
The NeoFinder Map is hidden and shown along with the NeoFinder Inspector section, but you can move the divider between the Map and the Inspector to change its size, and you can also hide the Map, but keep the Inspector around, if you don't need the Map.
That is accomplished by the Maps button found underneath it.
NeoFinder Bottom
At the very bottom of the NeoFinder main window, you can find a few more buttons, and information about what is shown in the Content View, and for the Icon View a slider to change the display size of the thumbnails to be shown.
![]()
What is next?
3.1 Catalog one volume
3.2 Catalog many volumes (Batch Catalog)
3.3 Cataloging settings
3.5 Update existing catalogs
3.6 Import existing catalogs of other applications
3.7 Catalog a Folder
3.9 AutoUpdater: Update Catalogs automatically at a certain time
3.10 Exclude certain files and folders from cataloging
4.1 Create and use folders
4.2 Rename catalogs
4.5 Backup your NeoFinder database
4.6 Database Status
4.7 Move your NeoFinder to a new computer
4.8 Use color labels to mark interesting items
4.9 Rate your photos
4.10 Sort your NeoFinder catalog library
4.11 See what is in your catalogs - The fill bar
5.1 QuickFind
5.2 The Find Editor
5.3 Find Duplicates
5.4 NeoFinder QuickFind in the Menu
5.5 Spotlight Support in NeoFinder
5.6 The Find context menu
5.7 NeoFinder Search URLs
5.8 Find Similar Photos
5.9 Find Faces
NeoFinder 7 Introduction (4:29)
This gives you a quick introduction into NeoFinder, and what NeoFinder is all about.